
Update May 20th, 2020: Release Version 1.5
- Added two new dithering tools to the original set of three Soft Dither tools for 6%, 12%, and 18% highlight dithering. New additions are 12% and 18% highlight Hard Dither tools to produce a denser 10% minimum pixel density highlight dithering. This addition is meant as an assist to those alternative print making processes needing a darker minimum highlight dither density.
- Changed the default final leveling ‘Level Dither’ highlight linearizing adjustment to better match the expected working environment of these tools.
- Documentation expanded upon tool use and expected image and color space working environment
Download: Highlight Dither Photoshop Action
BONUS: Included in Highlight Dither Photoshop Action v1.2 is an action ‘Highlights & Shadows’ to create luminosity masks for the three highest highlight, three lowest shadow, and the mid-tone areas of an image. While not intended to work directly with the dithering actions, the ‘Highlights & Shadows’ action is good on its own. Instructions for its specific use can be found here:
How to Create and Use Luminosity Masks in Adobe Photoshop by Kirk Nelson
https://design.tutsplus.com/tutorials/how-to-create-and-use-luminosity-masks-in-adobe-photoshop--cms-23549
B&W Highlight Dithering
Included in the downloadable Highlight Dithering Action v1.5 .zip file is this note as a PDF readable file and the Photoshop action toolset that includes three soft dithering options for 6%, 12%, and 18% highlight dither as well as two options for 12% and 18% hard dithering with a darker density minimum. This action set has been tested with the latest CC version of Photoshop as of May 2020 yet may work with PS6.
Description and Purpose
Working with B&W historic photographic printing processes and digitally created negatives one quickly finds that highlight detail is hard to reliably come by. It is all about the digital negative, exposure correction curves, and the highlight details hiding out in the blacks of the printed negative itself. Try as you may, printing with that last 10% of the exposure correction curve is at best frustrating and at worst you walk away from those precious highlight details and go for ‘high contrast’ instead.
To help put an end to the never ending tweaking at the highlight end of exposure correction curves in Photoshop, I’ve put together an action sequence that will stochastically diffusion dither the highlights using a minimum density of 7%. If you can reliably print down to 7%, then you can now reliably print down to 1%. The trade off is that you will want a relatively high DPI image to work from as the highlights are getting dithered and we want that dithering noise to be below the threshold of visual acuity in the resultant print.
When printing digital negatives on professional grade Canon and Epson printers, a 720dpi image is as high as you might want to go based on these printer’s mechanical resolution. An image at 360dpi is just at the edge of showing visible dithering artifacts when viewed up close yet not discernible at a distance of a couple feet.
Five actions are provided based on the specific needs of individual images and processes used to print them. Three tools for highlight dithering of 6%, 12%, and 18% density ranges using a minimum pixel density of 7% (Soft Dither). Two tools for dithering up to 12% and 18% density ranges using a minimum pixel density of 10% (Hard Dither).
The digital negative workflow for the action is simple: Create your B&W image or plate then dither and level the highlights. Once you are happy with the levels setting, go ahead and finish with the digital negative creation process.
These actions do have working assumption prerequisites based on the imaging workflows used by Special Edition Art Project practitioners, principally Photoshop’s working color spaces and the image itself must be setup in a specific way.
The Prerequisites
- Image must be in 16-bit mode
- Image must have an Adobe RGB color profile
- Image must be gray B&W (R=G=B) since we will be gray dithering the highlights
- Photoshop’s Color Settings preferences must be set accordingly:
- Working Spaces:
- RGB: ProPhoto RGB (RGB: Adobe RGB is also acceptable)
- Gray: Gray Gamma 2.2
- Working Space settings other than these will work with the dithering tools, just expect to set the final ‘Level Dither’ levels adjustment layer gamma value as needed.
- We prefer the working spaces of RGB: ProPhoto RGB & Gray: Gray Gamma 2.2 due to their essentially lossless behind the scenes pixel manipulation math.
- Conversion Options:
- Intent: Perceptual or Relative colormetric
Tool Use Instruction
Image Edits: Finalize the editing of your 16-bit Adobe RGB profiled B&W image, layers and all if that is your workflow. We prefer this setup for our B&W alternative printing process image manipulation simply due to the increased Photoshop tool set available for ‘color’ images vs. those fewer tools available for gray scale images.
Pick a Dithering Tool: Five total dithering tools are available. The first three tools, Soft Dither, dither highlights down to 6%, 12% or 18% with a minimum pixel density of around 7%. The second two tools, Hard Dither, dither highlights down to 12% or 18% with a minimum pixel density of around 10%, producing fewer but darker dithering pixels. These later two tools are useful when an alternative process simply can’t print below 10% image density. The downside of darker dithering pixels is more pixillation grain in the highlights due to use of fewer but darker densities to represent these most delicate image areas. The upside of course is that printing a 10% dot is much easier than printing a 7% dot for some of the most persnickety alternative processes.
Dither Highlights: Run your choice of highlight dithering tool. The Dither Highlights layer group will be placed topmost in the image’s layers. Note the dithered highlights are a capture of the image as it was when the dithering tool was run. If lower layers are post-modified the Dither Highlights layer may become out of sync and should be deleted, rerunning the dithering process to capture the new state of the image.
Adjust Highlight Levels: Adjust the levels adjustment layer Level Dither to set the gamma (middle adjustable value) to linearize the newly dithered highlights. If you are using the preferred Color Settings preferences then a value of 0.84 is about correct. Artistic license is always encouraged however – view the image at 100% and manually move the gamma slider until the image looks the way you like it.
Digital Negative: Once the image has been edited to completion with dithered highlights, move to your normal digital negative creation workflow.
Verify: For verification on the dither gradients down to 0% against your specific digital negative workflow and the process specific exposure correction, I've been using this density grid from Freestyle Photographic Supplies by Ron Reeder and Christina Z. Anderson. You can run the actions against the Freestyle image (make sure to adjust the image to 16-bit and AdobeRGB) and see the before and after of the highlight dithering and set the Levels on the Dither layer to adjust the dithering transition.
https://www.freestylephoto.biz/alternative-process/making-digital-negatives
Behind the Scenes in Three Easy Steps
Step One: Knockout the continuous tone highlights into a separate layer
Step Two: Diffusion dither the highlights into a separate layer
Step Three: Lay the new dithered highlights into the full image
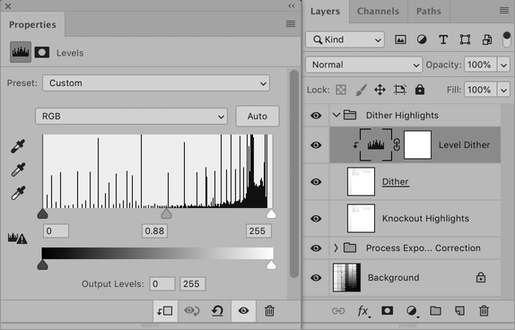
The final Levels command in the action sequence is critical to linearizing the newly dithered highlights. A leveling ‘Level Dither’ layer that acts on just the ‘Dither’ highlight layer is created for final highlight linearization.
To adjust the levels, double click on the histogram icon in the ‘Level Dither’ adjustment layer to reveal the Levels properties adjustment controls. Adjust the center (gamma) control from its default to get your highlights to better transition into your main image.
Final Notes
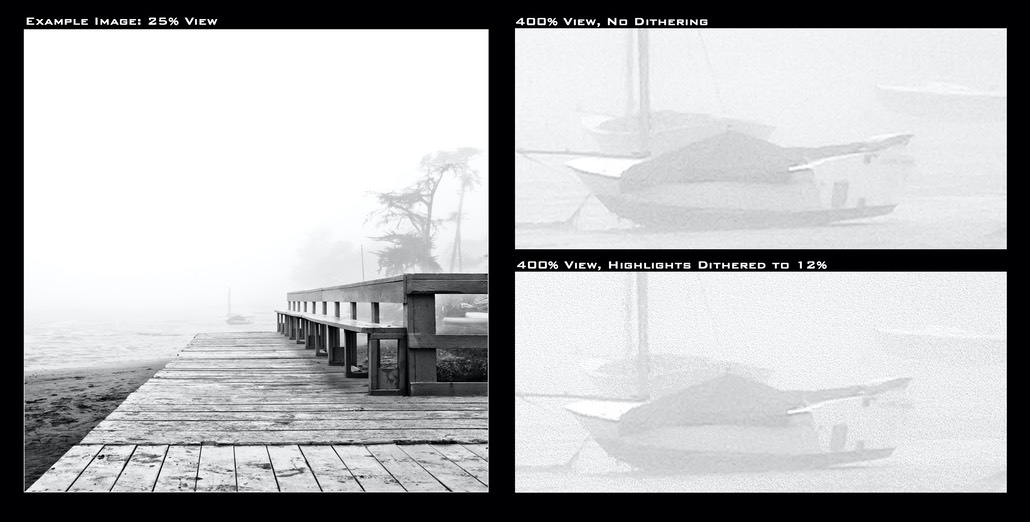
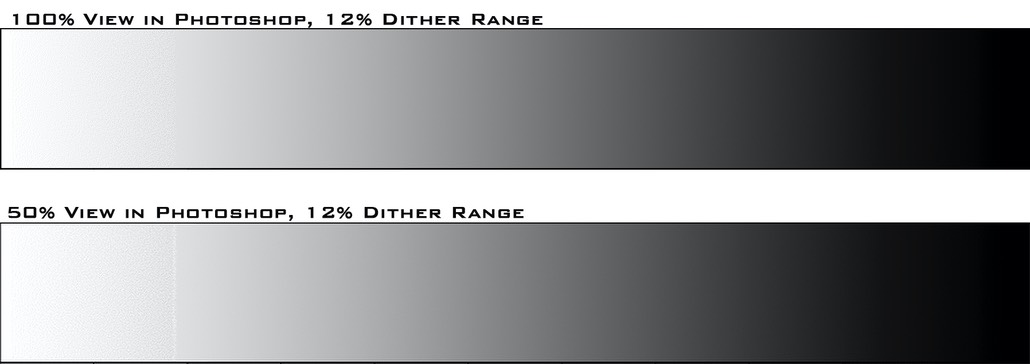
Viewing: When viewing a highlight dithered image, Photoshop and other applications will produce aliasing artifacts in the dithered areas when not viewed at multiples of 100%. This is a comparison example viewed at 100% and 50% from within Photoshop.
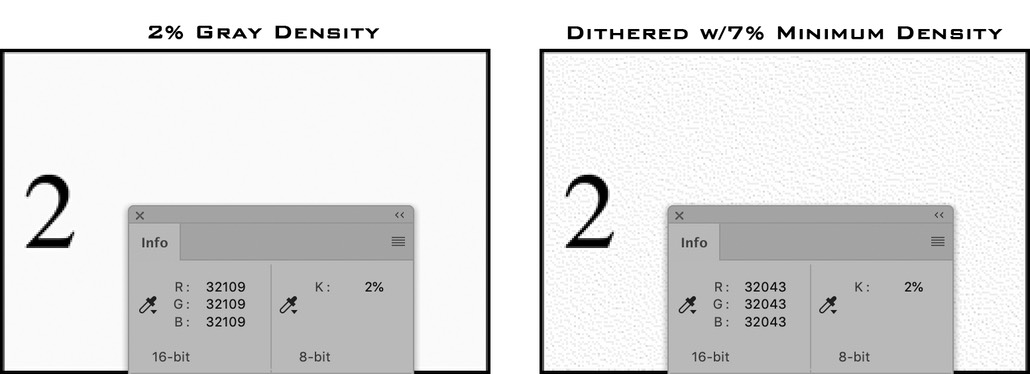
Eye-dropper Tool: Using Photoshop’s multi-pixel eye-dropper tool capable of seeing the dithered densities will verify the correctness expected in the dithered highlights. Here are highly enlarged examples of 2% gray and 2% dithered with a 7% minimum density dither.
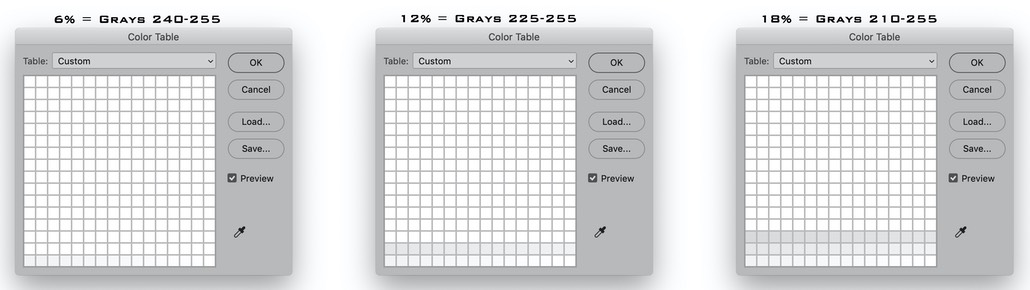
Knockout & Extract: Peeking inside the details of these tools, these are the color lookup tables used to knockout and extract the highlights for 6% (last row of 245-255), 12% (last two rows of 225-255), and 18% (last three rows of 210-255) dithering. There is plenty of room for modification here if dithering ranges other than 6/12/18% are desired.
Action Step Details
Step One:
- Convert full image to Gray Gamma 2.2 with Flatten, Black Point Conversion, and Perceptual rendering intent
- Convert image Color Depth to 8 Bits/Channel
- Convert to Indexed Color
- Set Color Table to produce specific highlight ranges only. All values except highlights are set to ‘white’. The following highlight values are kept alive for knockout and dithering: 6% = 240-255, 12% = 225-255, or 18% = 210-255.
- Convert image to Gray Gamma 2.2 with Flatten, Black Point Conversion, and Perceptual rendering intent
- Convert image Color Depth to 16 Bits/Channel
- Convert to Adobe RGB, Black Point Conversion, Perceptual rendering intent, and Dither of the previous color space
- Select all (highlight knockout image)
- Copy (highlight knockout image)
- Backup history to beginning of this action step - beginning of Step One
- Create New Group called ‘Dither Highlights’
- Select layer ‘Dither Highlights’
- Move layer to front, making ‘Dither Highlights’ the topmost group
- Create layer ‘Knockout Highlights’
- Select layer ‘Knockout Highlights’
- Paste (highlight knockout image)
- Hide layer ‘Knockout Highlights’
Step Two:
- Convert full image to Gray Gamma 2.2 with Flatten, Black Point Conversion, and Perceptual rendering intent
- Convert image Color Depth to 8 Bits/Channel
- Convert to Indexed Color
- Set Color Table to produce specific highlight ranges only. All values except highlights are set to ‘white’. The following highlight values are kept alive for knockout and dithering: 6% = 240-255, 12% = 225-255, or 18% = 210-255.
- Image Size, resize image: Width 400%, 360dpi, Constrain Proportions, Interpolation Automatic. Result is a minimum 7% dither density based on an image resize of 4x%. To get a 4% minimum dither density value, resize / downsample at 5x% or use 3x% resize / downsample to get 11% minimum density value. Most processes can reliably produce a 7% visual density image and is where this action set is focused.
- Convert image to Gray Gamma 2.2 with Flatten, Black Point Conversion, and Perceptual rendering intent. We have to go through Gray from Indexed to get to Bitmap mode, and is why we need to have available the greatest color gamuts set in Photoshop’s Color Settings preferences
- Convert to Bitmap mode, 360dpi, Diffusion Dither
- Convert to Gray mode, 4x downsample dither. This creates the dithered highlight image
- Convert image Color Depth to 16 Bits/Channel
- Convert to Adobe RGB, Black Point Conversion, Perceptual rendering intent, and Dither of the previous color space
- Select all (dithered highlight image)
- Copy (dithered highlight image)
- Reset history to begin of this section - beginning of Step Two
- Select layer ‘Dither Highlights’ (the group)
- New layer called ‘Dither’
- Select ‘Dither’ layer
- Paste (dithered highlight image)
Step Three:
- Show layer ‘Knockout Highlights’
- Select layer ‘Dither’
- Set layer blending mode to ‘Darken’ (not ‘Multiply’)
- Select layer ‘Knockout Highlights’
- Set layer blending mode to ‘Divide’
- Select layer ‘Dither’
- Levels Adjustment Layer ‘Level Dither’ locked to the ‘Dither’ layer.
Highlight leveling is pre-adjusted. You may need to manually level the dithered highlights to your specific image and digital negative workflow process. - Select group ‘Dither Highlights’
Fin!
About the Author
Eric Anderson
As a youth in the late Nineteen Hundred and Sixties, Eric started with a Kodak 126 Instamatic and moved in the ’70s to an Olympus OM-1 – photography became locked into his psyche. The ’80s & ’90s were a time of change with studies in the arts and humanities, the physiology of color and perception, and the applied sciences of math, physics, and chemistry. In parallel, a printmaking move to Cibachrome and the digital darkroom with pigmented quad-tone and color inks solidified the desire to mix analog and digital printmaking. An engineering career in the nascent late ’80s technology industry became priority over the next three decades; designing, patenting, and creating software & hardware systems for the creatives of the world, photographers and color designers in particular. In winding down his twenty-seven year effort to surprise and delight, it was time to again merge into the world of active creative printmaking – forming the Special Edition Art Project with its’ mission to inspire artists and create community for the exchange of ideas and techniques.
Edited May 20th, 2020